
Tying the Deadhead Minnow
A few years ago, I began experimenting with techniques to create a large cigar-shaped baitfish pattern made from craft fur. The goal was to tie a round-bodied pattern that was neutrally buoyant… something like a fly-version of a Corky lure. I could clearly visualize this fly in my mind, but had no idea how to make it.
After going through many evolutions in design and materials, I eventually learned to build the fly by dubbing a thick fuzzy craft fur body and then smoothing a fabric paint skin over the head. The fabric paint skin was a key feature. It made head of the fly hold its hot dog shape and it provided a solid surface for gluing on eyes. The skin also allowed the fly to shed water easily making it light and accurate to cast. I called the finished fly the “Deadhead” and it has become one of my favorite flies for both fresh and saltwater.
The Deadhead is a great fly for tricking trout, especially when they are feeding around structure or staking out potholes. Under these conditions, the Deadhead should be paired with an intermediate line and a leader with a long fluorocarbon tippet. With this rig, the Deadhead can be virtually dead-drifted or fished with slow twitches and tugs that absolutely bring the fly to life. It is a great combination. For deeper water, like channel edges and drops, I couple the fly with a fast sinking line. Throwing this fly along on a fast sinking line along current swallowing edges during an outgoing tide is deadly.
The Deadhead Minnow is also highly effective on striped bass and smallmouth bass when fished deep over structure, rock piles and gravel flats with sinking lines, or just under the surface behind a floating line. Regardless of depth or presentation style, a loop knot is always used to connect the fly to the leader, and is an important component in creating lifelike action.
I have tied this fly in many different color combinations, but my favorites are solid chartreuse with pearl flash and pearl glitter paint, and grey/white with silver flash and silver glitter paint. Another option for the skin is silicone. Silicone is not quite as durable as fabric paint, but it has a ghostly translucence and fleshy texture that fish like.
I have received many e-mails and phone calls from folks wanting to learn to tie this fly. The methods used to tie the Deadhead are not complicated, but they are unconventional and there is a learning curve involved in tying it. My best advice for tying this fly is to take your time when forming the dubbing loop and then go as light as possible with the fabric paint skin. Don’t get discouraged if the fly doesn’t look right as you are tying it because it usually will come together in the end. Stick with it. It’s a great pattern. Here are the materials and tying steps:
Materials
Hook: 1/0 to #2 short shank wide gape hook like- Mustad C70SD, Mustad Tarpon Hook, Tiemco 800S, or Gamakatsu Finesse
Thread: Danville’s 210 denier flat waxed nylon or clear nylon mono
Eyes: Silver ¼” 3D stick-on (flat adhesive eyes on silicone versions)
Tail: Rainy’s or Hairline Dubbin’s extra select craft fur
Tail Flash: 8-10 strands Krystal Flash or Polar Flash
Body: Rainy’s craft fur or Hairline Dubbin’s extra select craft fur
Body Flash: Hairline Dubbing’s Ice Dub (optional)
Skin: Tulip Glitter dimensional fabric paint or GE Silicone
Banding/shading (if desired): Prismacolor or Sharpie permanent markers

Step 1: Secure the thread to the hook shank and wrap back to the base of the bend of the hook, covering the hook shank with a layer of thread.
 Step 2: Tie in a slender tapered clump of craft fur on top of the hook shank, overlay 8-10 strands of equal-length Krystal Flash, and tie in one more slender tapered clump of craft fur on top of the Krystal Flash.
 Step 3: Make a dubbing loop 5 inches long by looping the tying thread around your finger and back up to the hook shank. Wrap thread from the bobbin around the base of the loop to secure it and then wrap the tying thread on up to the eye of the hook. Place a dubbing twister/spinner (weighted wire hook) through the end of the loop you have made and let it hang at the rear of the hook.

Step 4: Cut a full, even, combed bunch of craft fur and lay it out flat on the tying table with the butt ends of the craft fur aligned. On top of the craft fur, spread out a small pinch of Ice Dub shredded flash material.

Step 5: Carefully pinch the craft fur/Ice dub mixture and insert it between the two strands of the dubbing loop (this takes practice). Gently spread the mixture over the length of the dubbing loop, taking care to keep the ends aligned.

Step 6: Pull down on the dubbing spinner and twist the loop until you feel it begin to shorten slightly. Don’t over-twist the loop or you will break the thread. The materials will tangle around the loop as you twist it, so keep tension on the loop and pick them out with a small piece of Velcro hook pad.

Step 7: With the dubbing twister still hooked in the loop, wrap the loop slowly to the eye of the hook. Tie off the end of the loop with the tying thread just behind the eye of the hook and snip off the tag end. Pick the body out with Velcro hook material. The body should be full and fuzzy.

Step 8: Gently comb back the body fibers until they are smooth. The body should have a full round shape that tapers toward the tail.

Step 9: Run a small bead of Tulip Glitter fabric paint around the nose of the fly.

Step 10: Gently brush the glue rearward using a toothpick or small brush. The glue should not extend past the bend of the hook. Don’t mash the glue into the head, just create a thin skin over the head.

Step 11: Place a large dollop of Tulip Glitter fabric paint on the back of a 3D eye and gently press the eye into the fly. The eye should nest in the paint to ensure a good glue bond. The fly will dry to the touch in an hour or two, but it is important to let it dry for 36 hours before soaking it.
 You can also use silicone instead of fabric paint for the skin over the head. Shown here is a Silicone Deadhead with flat stick-on eyes below the skin. Silicone versions are neutrally buoyant and have a soft rubbery texture. This fly is tied on a wicked 2/0 Gamakatsu Finesse hook and has tagged many striped bass.

Check out the video below to see the finishing steps in action. Filmed at the 2010 FFF Conclave in New Braunfels, TX.


36 Responses to “Tying the Deadhead Minnow”
Great fly and instructions.
Love the way it dies doing the pause.
Trout seem to love it too.
Thanks Harris!
The pause-twitch-slowfall is deadly.
Casey
Have you considered tying this in a “bendback” style?
I tend to throw flies into grass, shell, rocks, trees, weeds, etc.
Hello Don.
I have not had luck tying this pattern in a bendback style because it doesn’t “roll over” very well. I don’t want to add weight to ballast it due to the fact the fly is a very slow sinker. Thought about tying it on a EC413 jig hook, but have not tried yet. I do, however, tie it with a weed guard made from 16 or 20 lb mason. The weed guards are moderately effective.
Casey
Came back to the site to check and make sure I bought the right paint today. (I was astounded by the variety to pick from)
To make a smaller fly, like a 4 or 6, would you have to shorten the craft fur in the loop by trimming the butts, or just make the fur in the loop more sparse?
Hope your still enjoying your Old Town Guide. I’m looking pretty seriously into getting one.
Hello Cliff.
Yes… there are a lot of different colors to choose from.
To make a smaller version, cut the butts of the fibers and add them into the loop along with the tips. The head of the fly requires bulk to maintain its shape. If you use fewer fibers it will lay down when you apply the paint.
Still like the Old Town Guide. It is a good boat for the money. A tad heavy, but very solid and stable and has a good feel. Considering how much gear you can put in it, the dry weight (70 lbs. I think) is really not that big of a deal.
Casey
Hi Casey,
THANK YOU for posting this great step-by-step.
3 questions:
How much fur goes into the dubbing loop for a fly of this size (#1 hook)?
Do you leave any underfur in the bunches used in the loop?
Do you comb/brush the fibers as you wind the loop onto the hook?
Thanks again for sharing this great pattern!
Hello Mark. Thanks for writing. I will do my best to answer your questions.
I wish I could give you an accurate way to measure how much craft fur to put in the loop, but it is hard to describe. Basically, it is a clump about as long and wide as your finger. The craft fur is placed in the dubbing loop and spread out, nearly doubling its overall length within the loop (see photos). This is done while maintaining tension on the loop before it is twisted. There is some trial and error involved to get the right amount. When you get it right, and you wrap the loop forward on the hook, you will reach the end of the material just as you reach the eye of the hook. The wraps should be tight and pressed “shoulder-to-shoulder” on the hook.
I leave the underfur in the craft fur because this gives the head some bulk. Without it, the head will flatten when you apply a skin of paint over the top. This is why the fly looks so fuzzy before it is combed and skinned.
I pick out the fibers with velcro after I twist the loop but before the loop is wound around the hook shank. This keeps the loop clean and even without a bulky center. As the loop is wound, the fibers are gently brushed back to keep them from fouling on successive wraps (sort of like you do when palmering hackle). When fly is wrapped and the thread is tied off, I pick a little more with velcro and then comb the fibers back so they are smooth and even around the hook shank.
Hope that helps.
Yes, that is exactly the information I needed!
Thanks again!
Your entire site is awesome, btw.
Thanks for the compliment Mark. Glad I could help with the pattern. Please let me know if you have any other questions.
Casey
[…] fly is the Deadhead by Casey Smartt, found at caseysmartt.com. The step by step can be found here. It looks like a great pattern to chase both smallmouth and largemouth […]
Casey,
I have been tying this fly for a while now and although I “tail” it with an icelandic sheep sandwich with core of flash it is essentially the same fly. Since your deadhead predates any other version I have seen to date I would like to commend you on an excellent pattern.
I think the sheep gives the tail section a more flexible motion and allows the flash to show through a bit better. (I also prefer wing n flash in this portion, cored and veiled)
My best color combo to date is electric chicken & reverse and while I’m throwing sweet water I expect it would also perform very well in salt. Some flies are worth the extra time it takes to tie them. This is one of them.
Good fishin’ on ya!
Ted
Thanks Ted! I am glad to hear you are having good luck with this pattern. Sounds like the wool and fine flash is a good combo. Like most patterns, this one has gone through several evolutions in hooks and materials and the ideas behind it were inspired by other flies and fly tyers.
Casey
what would you think of using ep shrimp brush for the dubbing and aleenes for the skin material…
You can do that with a decent result, but there are a couple of things to consider. First, the EP is a stiffer fiber and will not smooth down as easily as craft fur and the glue job will be a little rougher. It also has less fluid motion than craft fur. Second, it will be a more translucent fly. The Aleene’s will work fine as a coating for the head. When applied thin, it remains somewhat flexible.
Overall you will end up with a stiffer, clearer fly.
Casey
thanks Casey.. I’ve been experimenting and found the Tulip’s fabric paint does work better than the Aleene’s You are right the ep does make it a little more difficult to work the paint, but it makes the “dubbing” step easier for a beginner like me. However, my version does behave nicely in the water, it does still hover nicely and fooled some east bay trout this weekend. I used Aleene’s in my first versions because I had it on hand, but I definitely like the Tulip’s better.
I’ve been tinkering with some other flies that are similar to your fly and using the paint to create a skin on the head of the fly. I’ll let you know how well they work.
Great!
Glad you got started on it and found a “dubbing” method that works for you. I have had very good luck on the trout using a solid chartreuse version of this pattern. They do like that chartreuse!
Regards,
Casey
That is a great looking bait fish pattern. Have you used any other materials besides craft fur? I am planning on tying some up to fish for stripers. What are your favorite colors? Do smaller ones work for trout or panfish?
Gary,
I have tried a few other materials (EP Fibers, marabou, buck tail, etc…) but the craft fur seems to work the best. Have also been using Gamakatsu Finesse hooks which are good for freshwater. This fly works best in hook sizes #2 and larger. Mostly too big for panfish. Best colors have been solid white or solid chart.
Casey
thinking about tying a few, but was wondering if you’ve tried polar fiber? i hate working with craft fur because the fur gets everywhere.
You could sure try it. I don’t use Polar Fiber because the texture seems too fine and silky. But, it might be worth a shot if you like it better.
If you give it a try, let me know how it works out.
Thanks,
Casey
great Fly… BRAVO !
Thanks!
Great pattern. How do you tie in different colors in the dubbing loop?
Hello Kevin. Thanks for writing.
To create colored bands or collars, lay different colored clumps of craft fur in the dubbing loop and twist. Remember… the bottom of the loop will end up at the head of the fly. To create shading on the back of the fly, or mixed spots, stripes, etc… Use permanent markers on the fly before the skin is added.
Casey
Thank you sir.
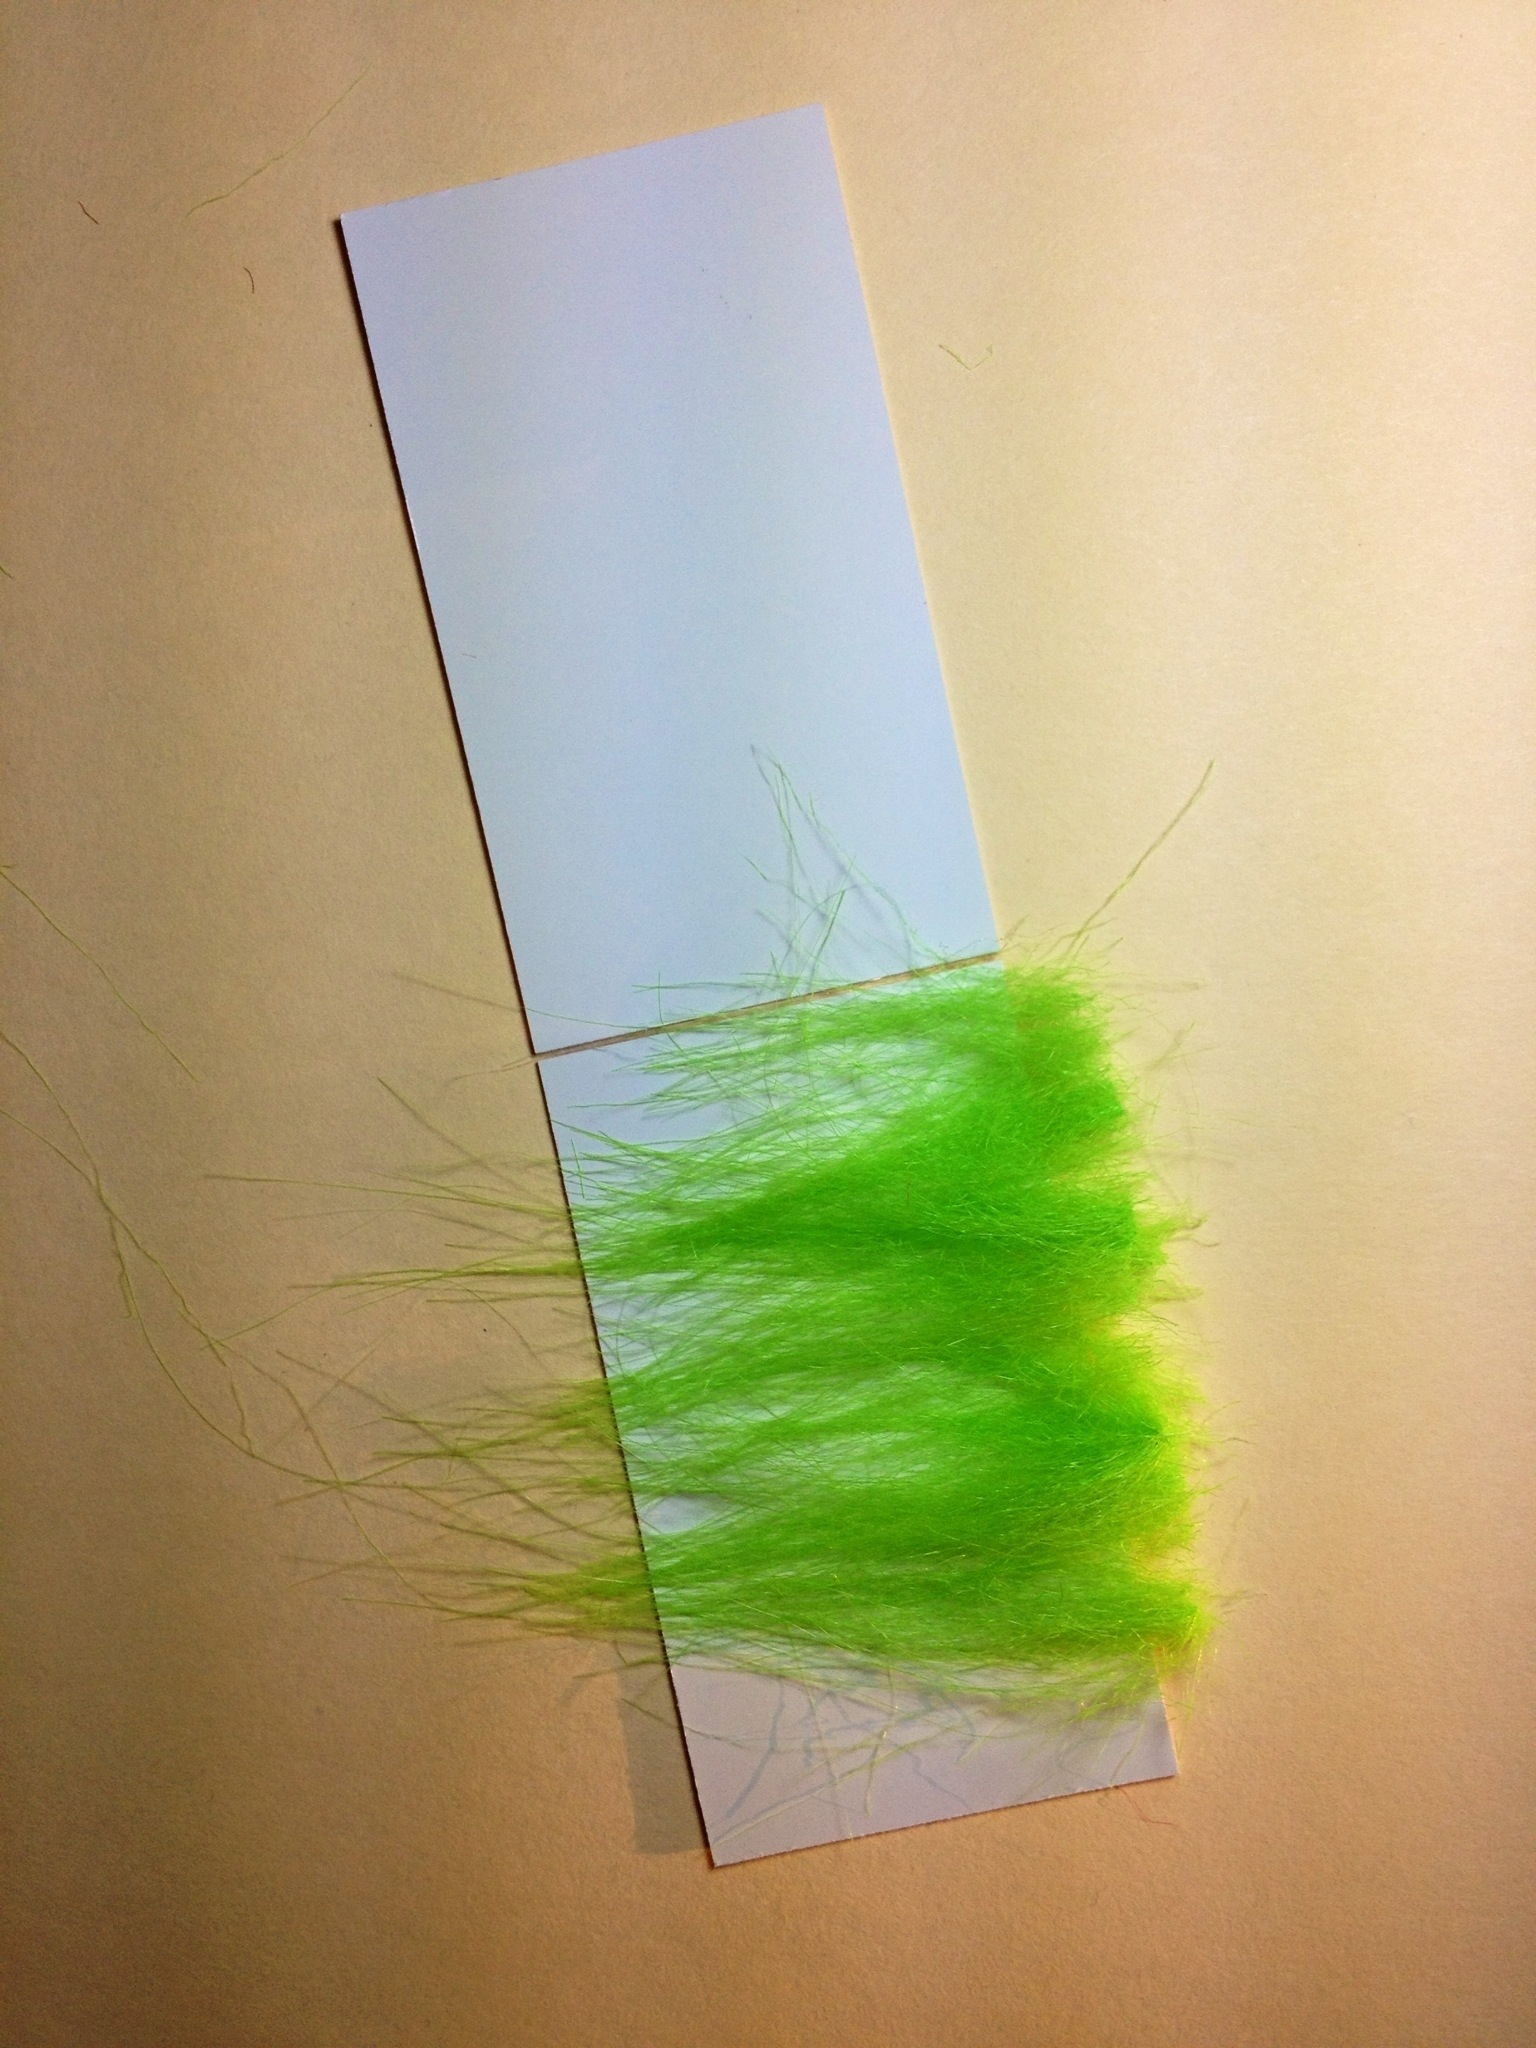
how do you manage to transfer and apply the craft fur/ice dub mixture from the table to the dubbing loop without making a mess of it ? Would it be possible to do a video of the tying procedure ?
Hello Ted.
I added some photos above that show a trick I use to handle the craft fur. It works great. Just tape 2 business cards together on one of the short sides and sandwich the fur between them.
Good luck,
Casey
Thanks for the tip Casey but there are no photos in your email. Ted C.
Ted-
The photos are above… In the SBS for the fly.
Casey
Hi Casey, great fly and great instructions! I can’t get Tulip where I live and have been using Softex (dipping the head in the jar), which tends to tighten the head of the fly considerably. Would liquid fusion be an alternative to consider?
Thanks, glad you like the fly.
Fabric Fusion will leave the head somewhat stiff. It will sort of work if a thin coat is used.
Casey
Thanks Casey!
Hi Casey,
Thanks for sharing your expertise on this fly. I was very excited to tie it to simulate a particular bait fish in a still water setting this spring. I have been working on a pattern such as this for a long time. You answered my question with this fly. I cast it on the snow bank while rowing my pram with the wind. The white caps lapped on the side of my pram as the fly slid into the water. I retrieved as fast as I could and caught fish after fish. I was stunned. One of the top ten fishing trips I have had. A few nights later, I drew a monster brown to the surface after the fly. Of course a large boat I was fishing from and my standing position curtailed a bite. I did get a birds eye few of this fish and now that winter is here, I will tie more!
Thank you Casey,
Gordon
Casey: When you palmer the fur in the dubbing loop, do you force both the tips and the butts back toward the hook bend, or do the butts get wrapped pointing toward the hook eye?
Your trick with the business card makes a tough job (for me) so much easier. Thanks.
Frank
Hello Frank.
Sorry for late reply. When palmering the materials forward with the dubbin loop, it is not possible to distinguish the tips from butts… the dubbing loop is a fuzzy mess. You wrap it forward, taking care not to overlap wraps and gently stroking the fibers rearward after each wrap to avoid tangles. Overall, the materials “trend” rearward. This is a totally different technique than tying the fibers down in a hi-tie manner where the tips an butts are handled individually.
Hope that helps.
Casey
Comments are closed.